How to set the Squid proxy to public
By using Squid Proxy, users can create their own proxy server. Usually Squid Proxies are traded, you know, but there are also websites that collect lots of Squid Proxies that are free to use.
It may not need to be explained again to use it, as it can of course be used with Squid Proxy to hide the current user’s IP. However, this is not the same as a VPN.
I said Squid Proxy is not the same as VPN for a lot of reasons. Using a public Squid proxy that is not your own is also not very secure, as the owner of the Squid proxy can certainly tap the connection, which is an action illegal or similar data theft Cookies and other.
However, it is safe for the user to use their own Squid proxy as the data it contains will not be visible to anyone else and only to the user.
Also Read: Easy Ways To Install Dropbear On Linux Ubuntu
The problem is usually that when installing Squid Proxy it can only be used on the local server and cannot be used on other IPs if not done White list.
This article will walk you through how to create a public Squid proxy that you can use to open any site, be it HTTP or HTTPS, with no hassle. Access denied or Connection refused.
Open a terminal via SSH and go straight to the Squid proxy configuration file.
Ubuntu
nano /etc/squid/squid.conf
Debian
nano /etc/squid3/squid.conf
Next, enter this code yourself above to allow the source of any incoming or outgoing connections.
acl all src allacl Safe_ports port 1-65535acl SSL_ports port 1-65535
Search posts http_access deny everything and change it so that it is not connected disputed when visiting the website.
http_access allow all
Still not ready. Scroll all the way down and add all of that code.
forwarded_for offvia offrequest_header_access All allow all request_header_access Authorization allow all request_header_access WWW-Authenticate allow all request_header_access Proxy-Authorization allow all request_header_access Proxy-Authenticate allow all request_header_access Cache-Control allow all request_header_access Content-Encoding allow all request_header_access Content-Length allow all request_header_access Content-Type allow all request_header_access Date allow all request_header_access Expires allow all request_header_access Host allow all request_header_access If-Modified-Since allow all request_header_access Last-Modified allow all request_header_access Location allow all request_header_access Pragma allow all request_header_access Accept allow all request_header_access Accept-Charset allow all request_header_access Accept-Encoding allow all request_header_access Accept-Language allow all request_header_access Content-Language allow all request_header_access Mime-Version allow all request_header_access Retry-After allow all request_header_access Title allow all request_header_access Connection allow all request_header_access Proxy-Connection allow all request_header_access User-Agent allow all request_header_access Cookie allow all request_header_access All deny all
Now save the configuration and restart Squid Proxy with this command.
Ubuntu
service squid restart
Debian
service squid3 restart
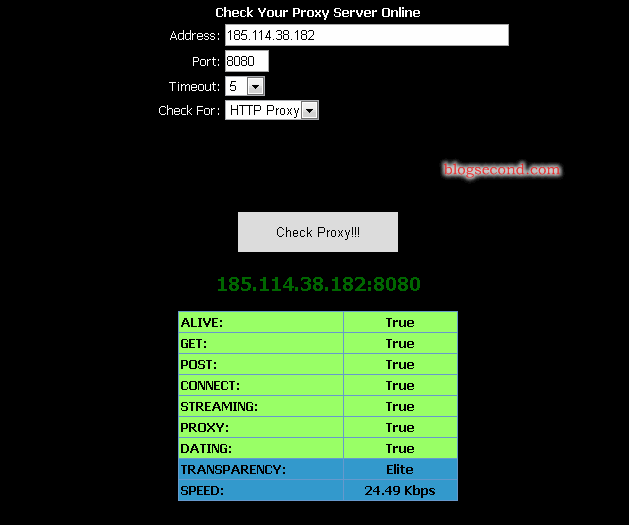
Try a test on the proxy check site to see if the proxy is really public. And if it looks like it, it means it worked.
If the user follows the method correctly, it will surely be successful, while sometimes the user forgets to apply the Squid proxy configuration by rebooting and just trying it out and of course it won’t work. So make sure that after switching the Squid configuration you can restart the Squid process at an earlier point in time or restart the system immediately to be more secure.
The users still don’t know how to install this Squid proxy? I shared that in the article Tutorial Install Squid Proxy on an Ubuntu VPS.
Making a proxy public is not recommended as there will be plenty of people using it for things that are prohibited by server providers, such as: Torrent. However, this can still be minimized using the proxy authentication feature and I will share this at a later date.
Hopefully useful and good luck